Do’s and Don’ts of Cosplaying a Zombie


Countless movies, a “Thrilling” music video, and a remarkably powerful TV show have made zombies an iconic image in our culture. While zombies are as popular as ever, there are some people who go a little overboard attire. We all want to experiment with new things to make our costume look more realistic but in the end safe is better than sorry. Some people have tried using chemicals on their skin or clothes that shouldn't be there or dressed too heavily and hurt themselves in the act. Here is a list of do’s and don’ts for enjoying your time portraying one of the “walking dead”.

Clothing

·        Do get comfortable and creative with your threads. Everyone is always impressed to see a new themed zombie. Try something people rarely do like a Monk zombie, anything that’s not the cliche mail man, suit, or cheerleader.

·        Don’t try and be a superhero turned zombie. It’s trying a little too much and only going to take away from whatever side of the costume you want to portray most.

Makeup and Props

·        Do use the fake blood, the full face of makeup or black and white face paint. Give yourself a few nasty wounds to enhance the flavor of the image.

·        Don’t ever use real blood or led-based paint on yourself. The last thing you want is to use substances that give off a completely repulsive smell, make people sick, or damage your skin. Remember there are certain types of paint that are harmful to your skin, know exactly what you are getting on you first. Some people try so hard to pull the zombie act off that they actually try to smell like one by using vinegar or some other fowl substitute for disgustingness, don’t do that.  Rub some dirt and water based paint on your clothes and skin and call it good.

Hair

·        Do make your hair look the part. Use some pomade or other type of gel to give yourself a more outlandish look. A small bit of dirt is ok but as I’m about to explain, be careful what you put in your hair.

·        Don’t rub anything in your hair that could mold or die. Have you ever picked up poison oak and made it sit in your hair or rubbed some dirt in up there that had a spider in it. Remember you’re trying to make other people scream, they’ll on laugh if you’re the one screaming because poison oak got on your scalp or bugs are crawling down your face.


Marie Sumner enjoys writing about entertainment and art. She owns more anime than she thinks appropriate to reveal to polite society. Recently, she started writing for Costume Super Center, which gives her an excuse to talk about cosplay costumes, comic books and zombies all day.

Fake Wounds


Sometimes fake wounds, scars or scratches are needed in your cosplay work. Today, we plan to focus on this and enrich a cosplay journey by vivid incised wound. Then, how to make a fake cut for cosplay? 


Step 1. Wash your hand.


Step 2. Find a piece of tissue and tear it into desirable size. Just make sure they are not too large. 


Step 3. Place tissues flat on your hand and glue them by latex. When the latex begins to dry, put one more piece of tissue on the latex. Repeat this until the thickness meets your requirement. 


Step 4. Wait until tissues and latex dry and then wipe a tier of foundation make-up on it. Be careful and don’t destroy the shape on the tissues.


Step 5. Daub brown, purple and red eye shadow on the wound. 


Step 6. Draw a gap in the middle and lift the edges. Size of the gap depends on your favor. 


Step 7. Dip blood plasma or red ink into the cut. Well control and adjust the volume while dipping. 


Step 8. Finally, the cut looks like this.


Step 9. If more tissues are used, or the gap is widened it will look like this. 


Simple and vivid, right? It will be useful especially when you’re on a budget.


Note: Original article is on cosplaytutorial.com. We take no ownership of the article and related image/s.

How to Make an Eye Patch

Materials needed


* Two pieces of cloth. I used two pieces of gauze (approx. 2"x2"); more upscale eyepatches can use felt or even velvet.
* Some length of lace for the border. I didn't had any around, so I used more gauze.
* Two pieces of elastic cord.
* Some red stuff for the red cross. I used red electrical tape because I didn't have red felt at hand. Felt or cloth would look better.
* White thread, needle, scissors, the usual stuff. Maybe glue if you don't like sewing too much, depending on the materials.


This cheapskate eyepatch used materials for around $3.


Time needed: 30 to 45 minutes.


Instructions


* Take one piece of cloth. This will be the "back" of the eyepatch. Sew the lace or ersatz material around the border, bunching it a little so it ruffles adequately.
* Cut two pieces of elastic cord so they fit your head. Tie the four ends. Sew them two and two to the corners of the piece of fabric on the same side as the border stitches.
Try to pass the needle through the elastic a few times for each end, so it doesn't slip out of place.
* If you're going to sew decoration on the "front" side of the eyepatch, do it now on the other piece of fabric.
* Sew this second piece of fabric it so it hides the stitches we have made on the first one. Imagine a sandwich: front piece on top, then the border in between, then the back piece. Sew through all three layers to keep them together.


Source: egl.livejournal.com

Temporary Tattoo Guide

Tattoo Guide

This guide will cover a variety of methods that can be used to create fake tattoos and similar markings.

Materials / Methods

These are the types of materials that can be used to create fake tattoos:
  • Henna
  • Body Paint
  • Skin Safe Markers
  • Skin Safe Inks
  • Skin Safe Paint
  • Makeup pencils
  • Liquid Eyeliner
  • Temporary Tattoo Paper


Tips

  • Remember that this will be applied to the skin so make sure to check that the product you are using is non-toxic!
  • Using a makeup sealant spray overtop of the tattoo can help it stay on for longer.
  • Temporary tattoos should be applied the day they are being worn so they look the best. Except for Henna.
  • If you are using paint, airbrushing it on can yield professional looking results
  • Tongue tattoos don't work. It is best to look for an alternative method that can't be washed away with saliva


Reviews

I have used some of the methods listed above. Here is my experience with them. Please note that the product was used on washed skin, with no additional sealants unless otherwise noted.


Acrylic Paint

Method: The acrylic paint was applied with a little bit of water. It was painted on with a thin brush.
Dry Time: It dried within a couple minutes.
Lasting Time: It survived over 4 hours without rubbin off, however there was some cracking of the paint
Removal: Remived with soap and water
Thoughts: Great if you need something quick but the cracking might cause difficulty with long wear. It can work well to imitate more detailed designs if watered down as used like an ink, and there are a large variety of colours available. 


Waterproof Liquid Eyeliner

Method: Painted on the liquid eyeliner on the skin using the brush it came with.
Dry Time:Very fast.
Lasting Time:Extremely long lasting. 
Removal: This required makeup remover to remove it.
Thoughts:This was a little restricting due to the small size of the bottle, meaning only the brush it came with and smaller sized brushes could be used for application. Great for smaller and precise designs. It has the best chance of not coming off during a convention. I find that more and more colors are becoming available but it is still fairly restrictive. 


Higgins India Ink

Method: A non-toxic India Ink was mixed with water in a pallet. The ink was painted on with a thin brush.
Dry Time: Less than 10 minutes.
Lasting Time: Surprisingly long, lasted over 4 hours.
Removal: Removed easily with soap and water
Thoughts: It is important to paint lightly with this ink, if it gets too watery then it will take far longer to dry and drip or run. Very easy to do detailed shading with the ink for complex tattoo designs. The ink will try and spread out into the creases of the skin, which can look messy if you use a very watered down ink.


Sharpie Marker

Method: Drew the design on with a thick sharpie marker
Dry Time:Very Fast
Lasting Time:Very Long
Removal:Soap and Water with Scrubbing
Thoughts:Good for solid designs, but not for faded shading that appears in some detailed tattoos. There is a wide range of color to choose from with sharpie and they dry fast. It does smudge easily before it dries, so be careful when drawing it on. Also, choose the right tip for the job! A thick market is good for filling in large areas but does not work well for fine details. The ink will bleed at the edges, be ready to tidy it up when finished. 


Original Source: cosplaytutorial.com

Eight Fake Blood Recipes

Fake blood can come in very handy if you aren't feeling ghoulish enough to use the real stuff. But the consistency and color of fake blood can vary, depending on the kind of recipe you use.
I spent a lot of time getting bloody to create these recipes from scratch. I'll show you how to make a variety of fake bloods for wearing, dripping, and generally grossing out your friends.
  • Spray-Bottle Blood - This water-based recipe is great for spraying clothes with blood.
  • Dark, Thin Blood - This lightweight recipe is good for smearing on clothing or walls.
  • Thick, Realistic Blood - A touch of cocoa gives this thick blood a dark tint.
  • Gross Blood - With flakes of skin and scabs inside.
  • Fake Flesh - Make chunks of flesh using items found in your kitchen.
  • Dripping Blood - This reddish brown blood is the perfect consistency for dripping down the walls.
  • Scabs - Make a clump of bumpy brownish scabs. Yum!
  • Prop Guts - Use our fake flesh and gross blood recipes for disgusting decoration.
Credit: Rain Blanken "Eight Fake Blood Recipes" [online] available at http://diyfashion.about.com

How to Make False Teeth for Cosplay


tandgjut.JPG (8539 bytes)
Time to make some teeth. It is quite expensive to get going as a lot of the materials needed costs a lot. But when you have all the equipment needed you will have a wonderful tool in your makeup kit. To the left you can see a dental tray used for casting the teeth.
All I show on these pages can be bought at a dental supplier.
Start by testing a tray for size.
tandgjut2.JPG (10594 bytes)
tandgjut3.JPG (11196 bytes)
Here I am filling the tray with a thick mixture of alginate.
I never do as the dentists do and put in the tray  in when the patient is laying down. I don't like filling peoples throats with goo! I always let the patient put the tray in by themselves and ask them to lean forward and drool.
tandgjut4.JPG (10338 bytes)
tandgjut5.JPG (11876 bytes)A few minutes later the alginate is dry and it is time to remove the cast. Sometimes it may stick a bit but that is only a vacuum and if you wiggle it a bit it will come loose.
Here you can see the finished cast. If you don't intend to fill it with plaster at once submerge it into water so it won't shrink.tandgjut6.JPG (7282 bytes)
tandgjut7.JPG (10544 bytes)Now I have mixed a little Ultracal that I carefully pour down the mould. Then I tap the mould against the table so the last air bubbles will come to the surface.
Now I let it set for about 45 minutes before I separate the moulds.tandgjut8.JPG (11246 bytes)
tandgjut9.JPG (11363 bytes)Then I fix the edges but am very careful not to damage the cast.
Voilá!  A finished cast of the clients teeth. Note the little muscle that normally is under the lip. It's important that you don't remove it as you can damage the muscle if you make a pair of teeth without making a slit for it.
tandgjut11.JPG (12355 bytes)


Credit: Make-up FX, "How to Make False Teeth" [online] available at http://www.makeup-fx.com

Do it Yourself Bras

  1. 1
    Step 1
    A bra you are willing to cut up that fits you well. If you don't want to cut it up, you can make a pattern from it, but it's ten times easier to just cut the sucker up! ((See that ginormous leopard-print bra? yeh that's how big I got when I was breastfeeding Vince. It's like 16DD)) 
    Fabric. I used two old singlets. It doesn't NEED to stretch, but it does help! 

    Fleece. I used regular ol' fleece to pad my bra! ahah. Did you notice this is a quick n dirty bra tute?
    Bra Straps - I didn't have any of these handy, so I just stitched lace onto regular 1cm wide elastic 

    Bra closure - I didn't have any of these handy either, so they don't do up at the back yet! ahah

  2. 2
    Step 2
    Now you're going to cut your bra up. The key here is to only cut up ONE HALF of the bra, so that you can see which way the pieces go with the uncut side! I'm using the black bra I already cut up as a guide for you guys. You'll want to cut down the middle of the bra ((centre of your chest)), cut the cup out, cut down the seam in the centre of the cup - if your bra doesn't have this seam, cut a curved line approximately down the middle. Cut the straps off too. If you're using shirts and not one continuous piece of fabric, cut the side seam of the bra as well. Cut the bra closure at the back off also.

  3. 3
    Step 3
    This is what your pieces should look like

  4. 4
    Step 4
    Now get the shirts you will be working with. Cut up the sideseam and the shoulderseam. If it's a tee, cut off the sleeves.

  5. 5
    Step 5
    Ok, here's a good tip. Instead of cutting straight onto fabric, trace around your pieces, adding 1cm on all edges for seam allowance onto paper. This way you can adjust your pattern when you finish your bra - to make it fit better. Now use those pattern pieces and cut out 2 of each pattern piece.

  6. 6
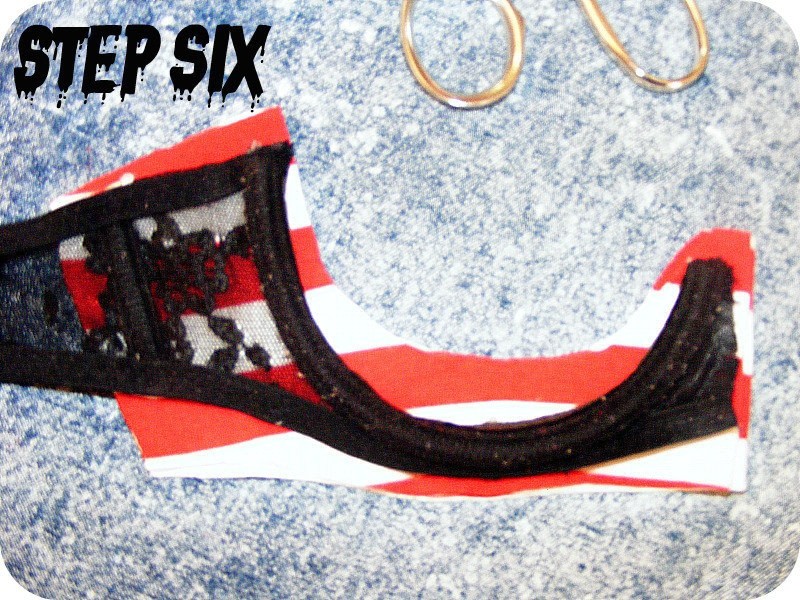
    Step 6
    Don't forget that the main part of the bra ((the bit that the cups are stitched onto)) should be cut on the fold ((remember you cut down the centre of this piece and left half of it intact)). Don't add a seam allowance to the centre front like I did. Lol.

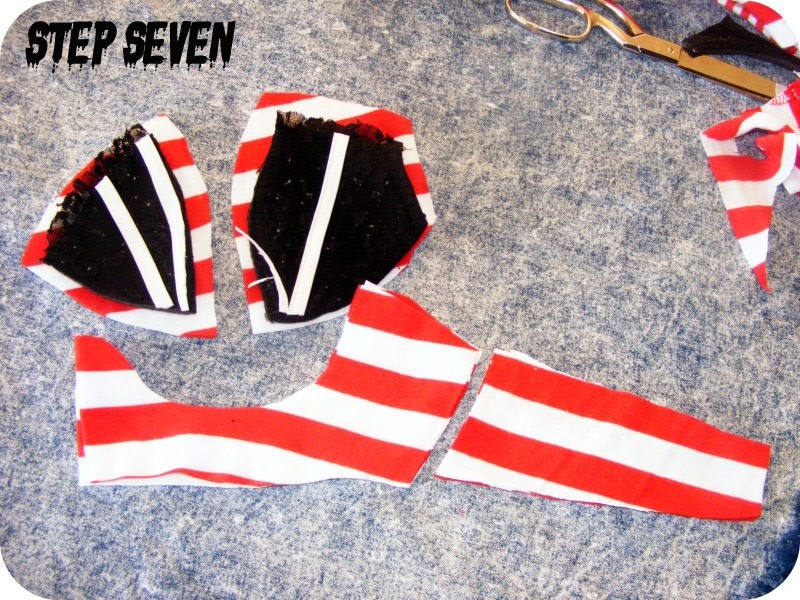
  7. 7
    Step 7
    If you've got the underpart in two pieces, cut the back pieces out now too. Add seam allowances!

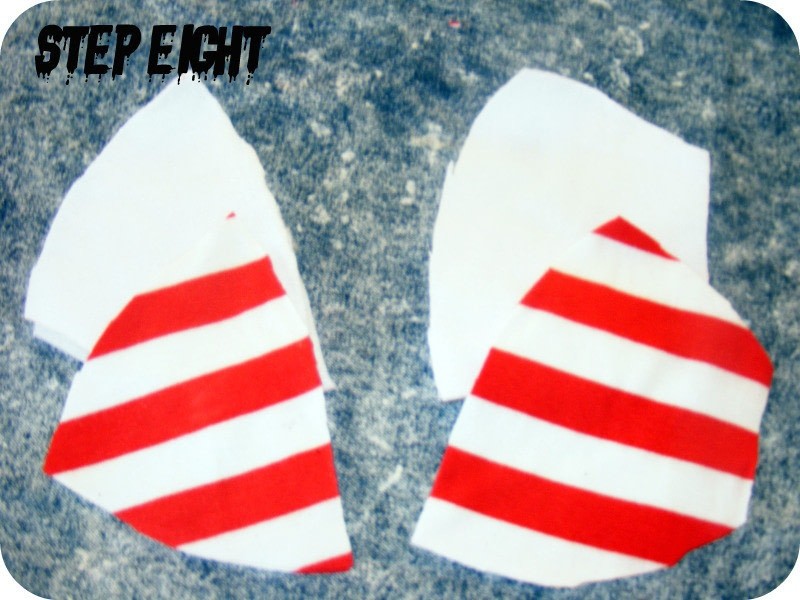
  8. 8
    Step 8
    Cut out a pair of the two bra cup pieces out of the fleece. This is going to serve as your padding. :D ((wow.. super blurry photo max...))

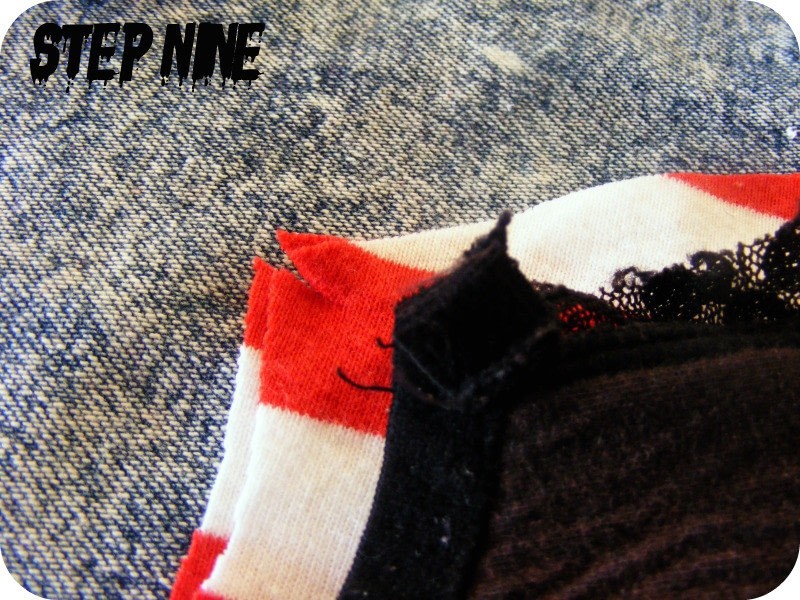
  9. 9
    Step 9
    Now find on your outside cup section the part where the strap was attached. line this up with the pieces you cut out and do a little snip to mark that point. This is to mark where you will sew your new straps onto.

  10. 10
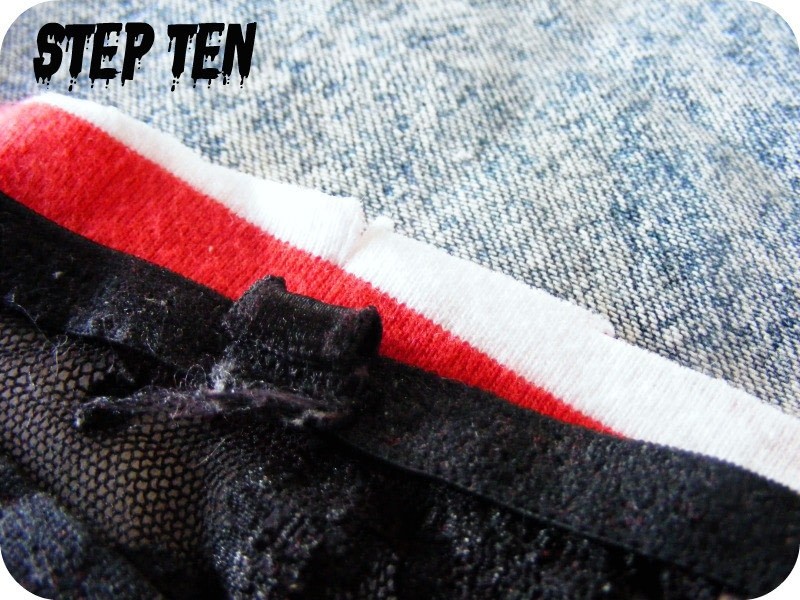
    Step 10
    Do the same for the back

  11. 11
    Step 11
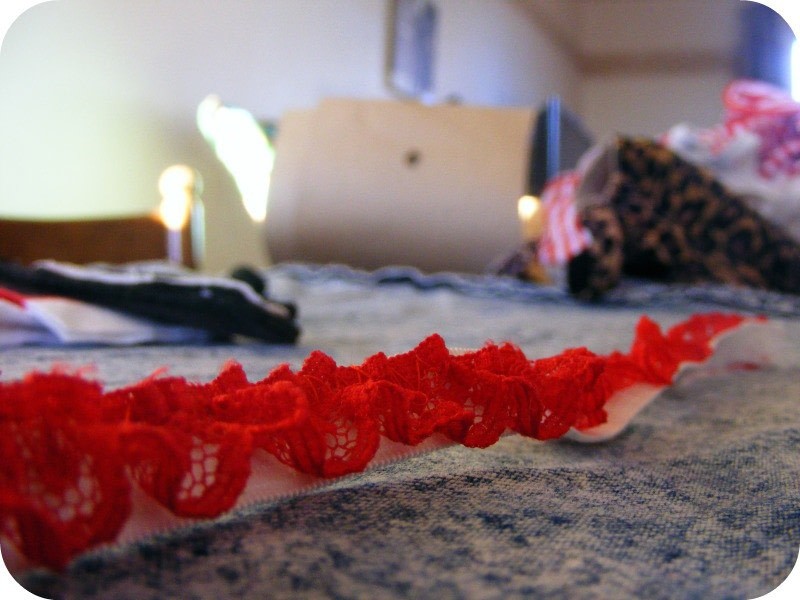
    If you havm't bought proper bra straps for this, cut elastic to the length you need. You can use fancy elastic, I just used plain white elastic and...

  12. 12
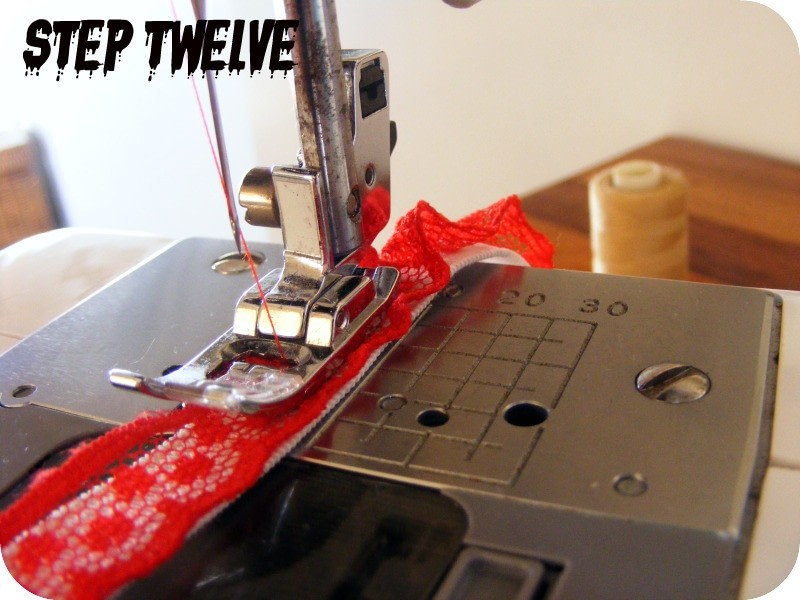
    Step 12
    stitched some red lace onto it! If you stretch the elastic as you sew, it will ruffle up nicely

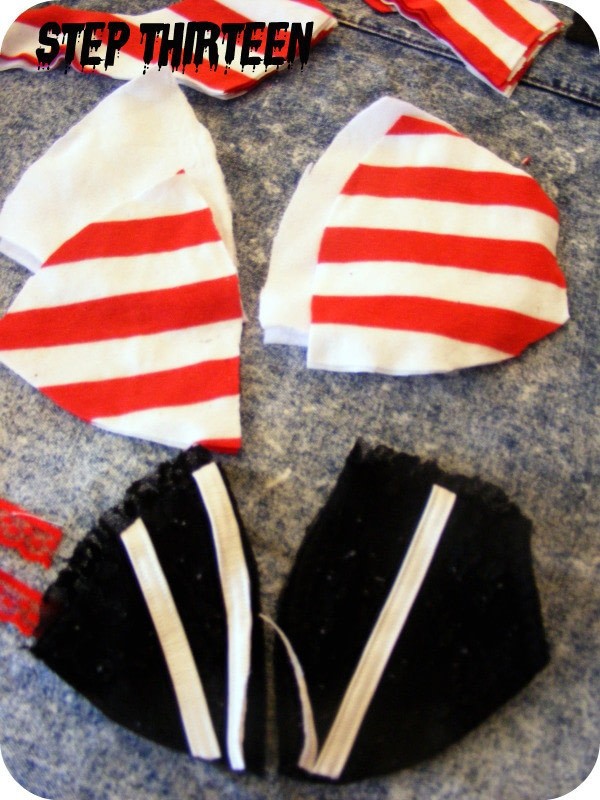
  13. 13
    Step 13
    Ta-Daaaa, pretty bra-strap!

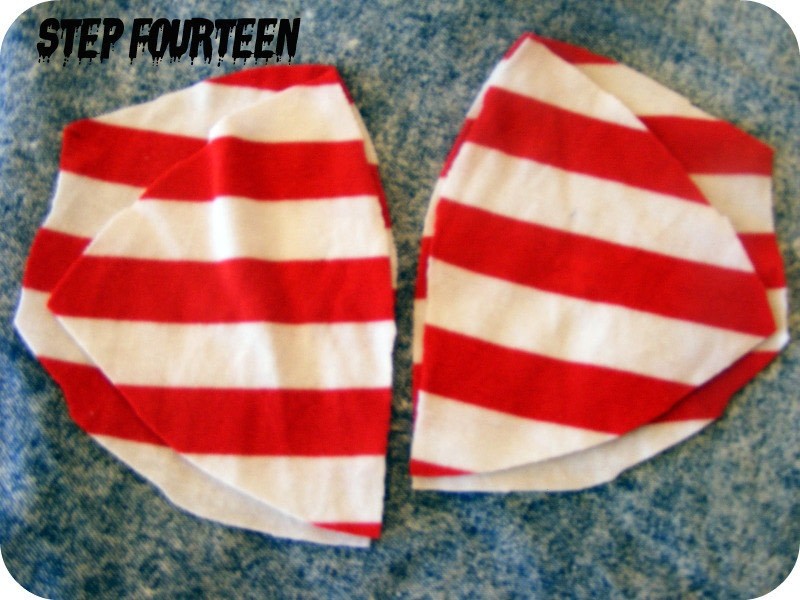
  14. 14
    Step 14
    Now we'll do the cup.

  15. 15
    Step 15
    Get the inner cups and place them ontop of the outer cups, right-sides together. Use the uncut side of the old bra as a guide.

  16. 16
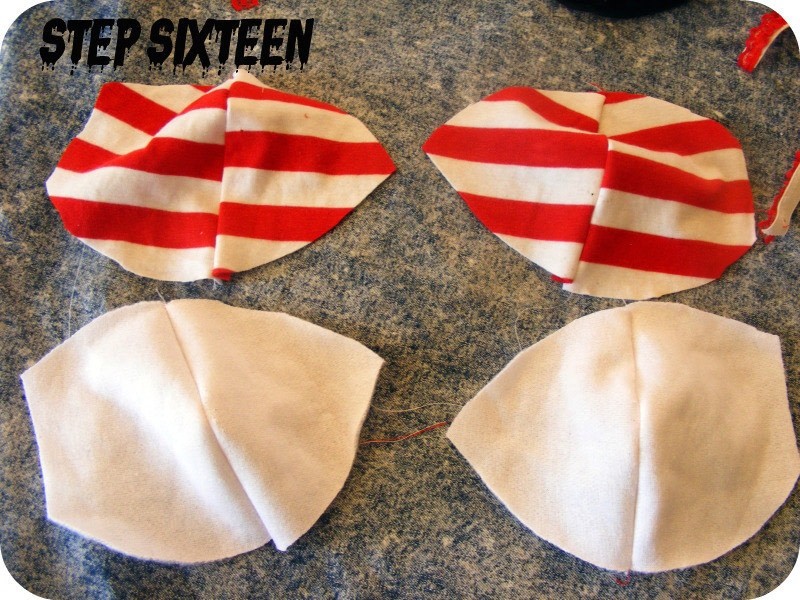
    Step 16
    Stitch 1cm from the edge.

  17. 17
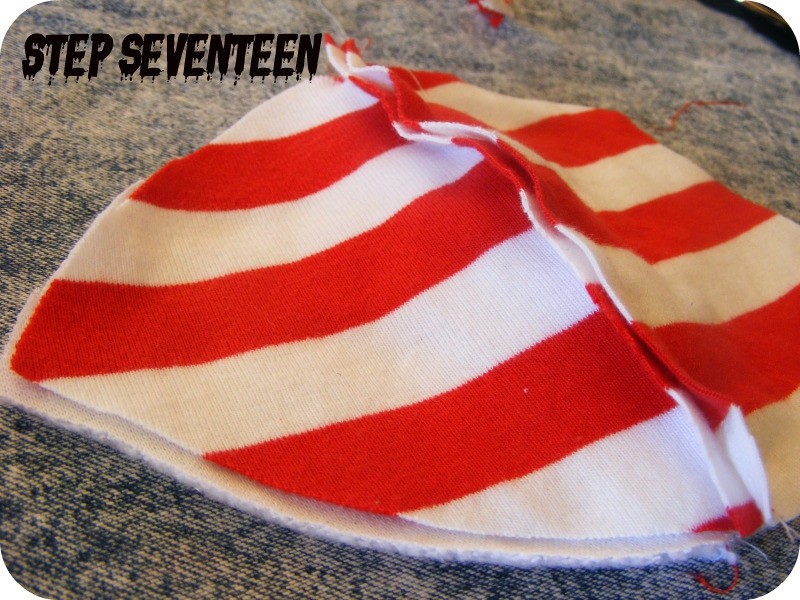
    Step 17
    Do the same with the 'padding'

  18. 18
    Step 18
    Now lay the cup over the padding, making sure you're matching up the right ones.

  19. 19
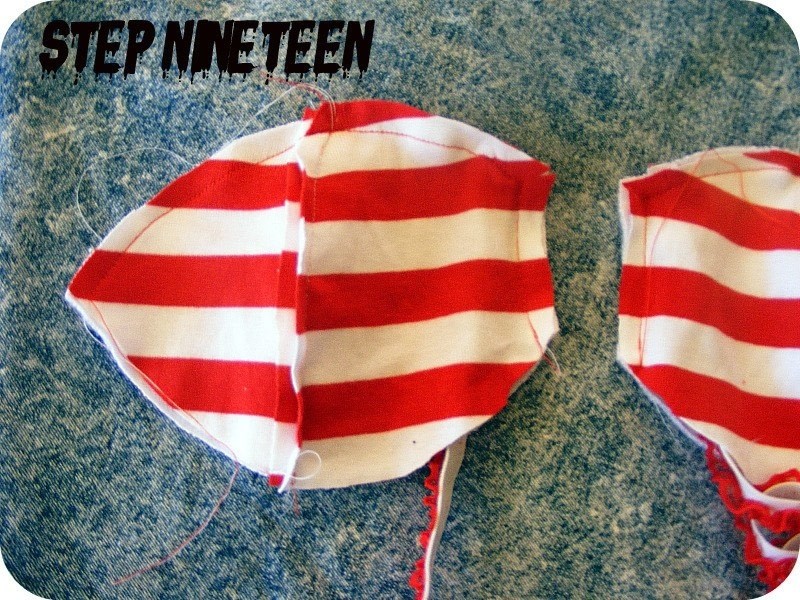
    Step 19
    Sandwich the bra strap between the padding and the cup.

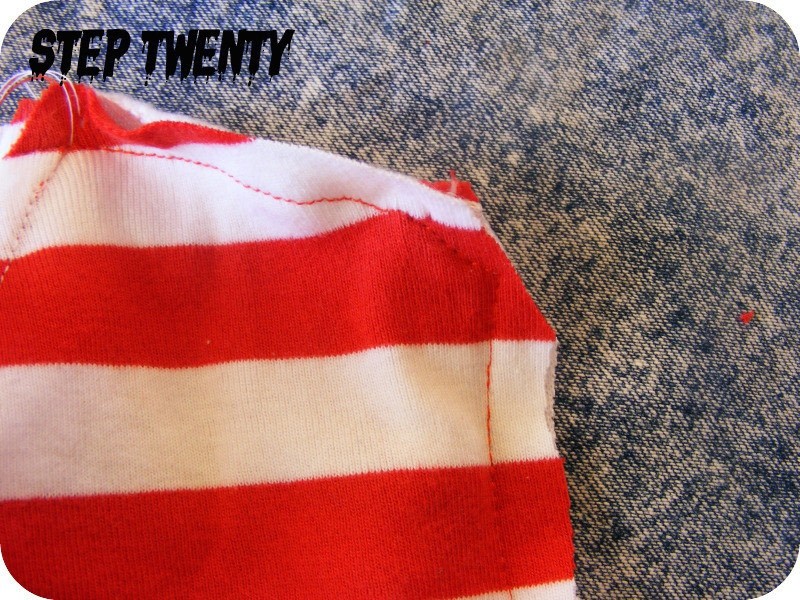
  20. 20
    Step 20
    Pin

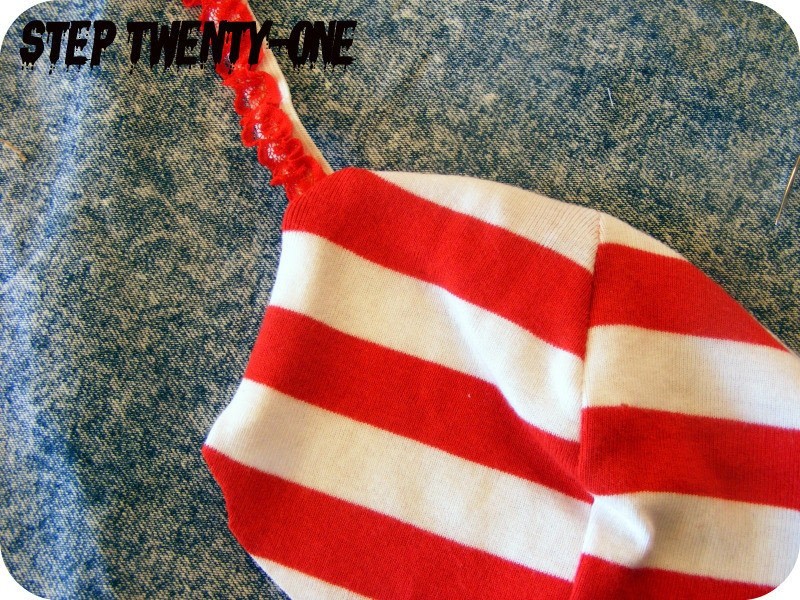
  21. 21
    Step 21
    Then stitch across the top of the cup and the outside.

  22. 22
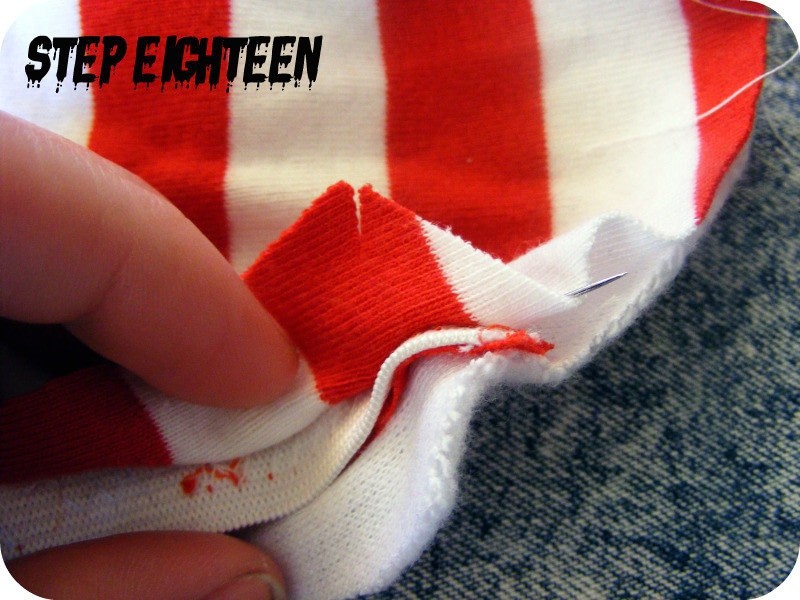
    Step 22
    Clip the corner where the strap is.

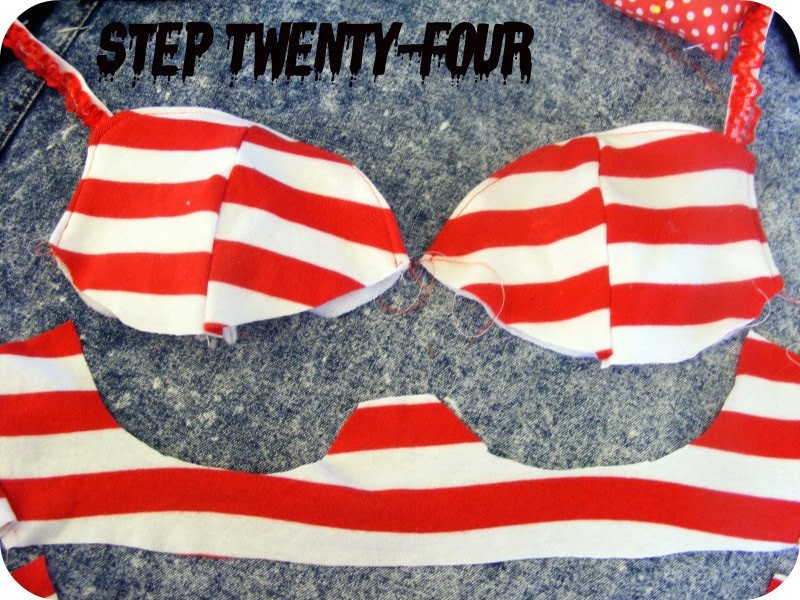
  23. 23
    Step 23
    Whoops. I had my strap the wrong way! Trusty unpicking time!

  24. 24
    Step 24
    Yeh that's better!

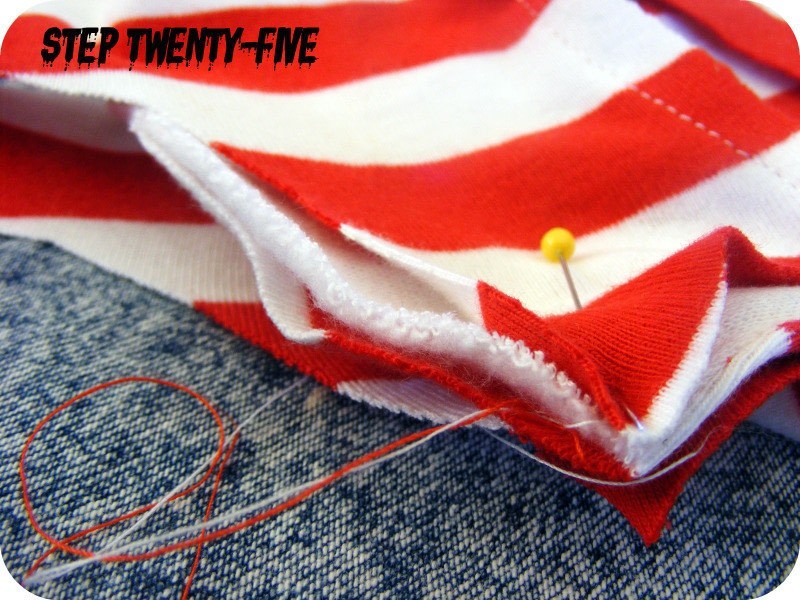
  25. 25
    Step 25
    Top-Stitch the edges you just stitched.

  26. 26
    Step 26
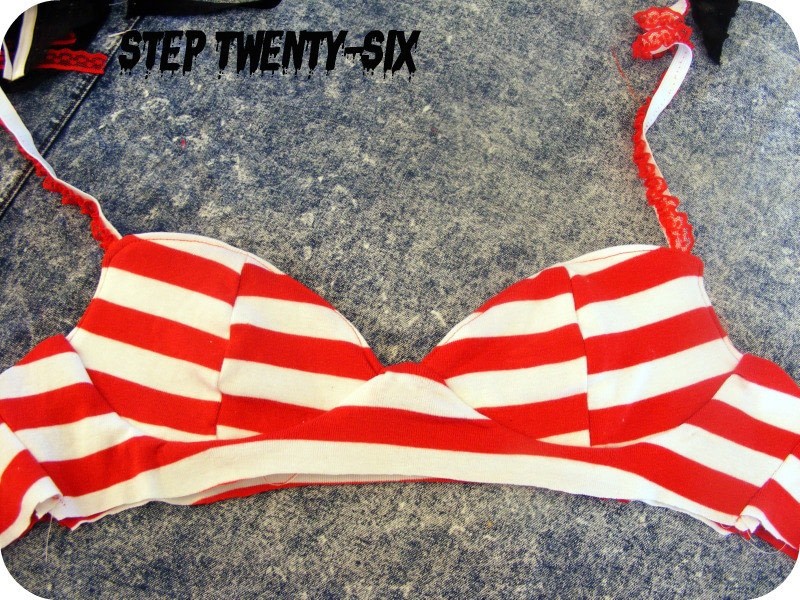
    Get your main bra pieces.If they aren't in one piece, stitch the backs to the front.

  27. 27
    Step 27
    Get your cups and line them up

  28. 28
    Step 28
    Sandwich the cups between the main pieces and pin

  29. 29
    Step 29
    It should look like this.

  30. 30
    Step 30
    Stitch from the end of one cup right acrossto the other side. The middle part where the cups do not join should be flat across. Flip it the right way and it should look like this. Now flip it back inside out again!

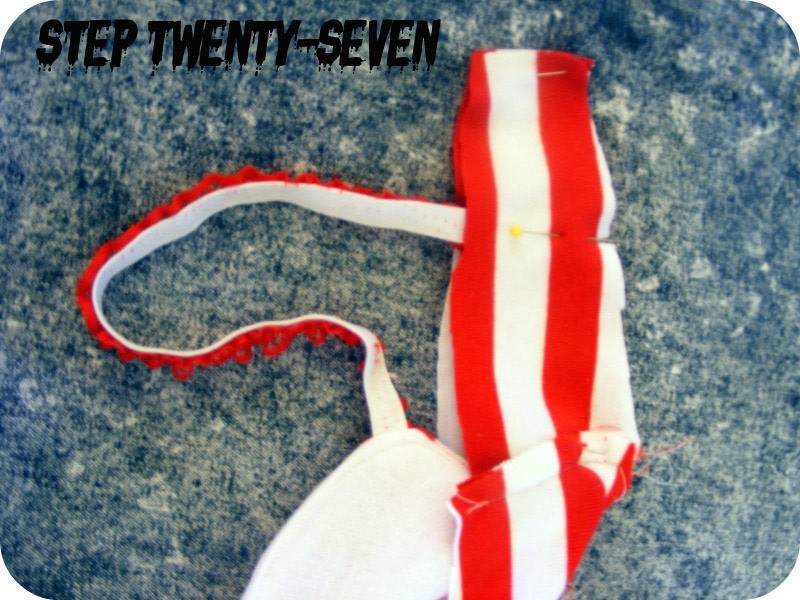
  31. 31
    Step 31
    Pin the ends of the bra straps down to the parts of the bra back where you snipped it earlier. Sandwich the strap between the ends and then stitch.

  32. 32
    Step 32
    Then top-stitch.

    And this is where I cleverly forgot to take more pictures! I'll give you a wordy tute now, and add photos for ya'll later! If you're stuck on anything, let me know! Send me an email!

    After you've top-stitched, cut a piece of fabric 2x as wide as you want the little band at the bottom ((don't forget to add seam allowances)). The piece of fabric is going to be as long as the bottom. Fold it in half lengthways and stitch it the bottom of the bra. Topstitch the seam allowance down.

    TA-DAAAAAA

    You're done, now just DIY some sort of bra clasp if you havn't bought one. Velcro? Press-studs? Mine have pins in them, ahahahah. So rock n roll...
Credit: Do it Yourself Bra, "Make Your Own Damn Bras" [online] available at http://www.cutoutandkeep.net